Ice Maker and Water Dispenser Under a Counter
Yes, you can install an ice maker and water dispenser under a counter if both units are designed for that location and you meet their clearance, ventilation, plumbing, power, and access requirements.
On this page (9 sections)
- Can an ice maker and water dispenser go under a counter?
- How much clearance and ventilation do the units need?
- What plumbing and drainage should you plan?
- Where should power outlets and controls go?
- Which water dispenser styles suit an under-counter plan?
- How can you keep service access clear?
- How do you choose equipment for the space?
- What should you check before installation?
- Can an ice maker and water dispenser fit under a counter?
Yes, you can install an ice maker and water dispenser under a counter if both are designed for that location and you meet their clearance, ventilation, plumbing, power, and access requirements. Many countertop-height water coolers are freestanding machines, so they may not work safely or conveniently inside a closed cabinet.
Start by choosing the appliances, then plan the cabinet around their installation instructions. A tight opening can block airflow, make servicing difficult, or leave no room to replace a bottle or filter.
Can an ice maker and water dispenser go under a counter?
They can share an under-counter area if each appliance is approved for that type of installation. An under-counter ice maker is often built to fit beneath a counter, but a freestanding water cooler may need open air around its cabinet.
Check each model's installation manual for the intended location. Look for required opening dimensions, ventilation direction, water connection, drain, power supply, and any minimum distance from walls or other appliances.
A built-in label alone doesn't answer every question. Confirm that your specific cabinet, countertop, and utility connections match the unit's instructions.
If you're deciding between an under-sink tap and a bottle-fed cooler, first read what an under-sink water dispenser is. For broader planning, our guide on how to buy a water cooler dispenser explains the main styles and features.
How much clearance and ventilation do the units need?
Leave the clearances the manufacturer specifies, and keep every vent unobstructed. The required space depends on where a unit releases heat and how it draws air.
Some ice makers vent through a front grille and can sit close to cabinetry when installed as directed. Others need room at the sides or back.
A water cooler may also use side or rear vents, so enclosing one can trap heat and affect operation.
Measure the usable opening after accounting for trim, hinges, drawer slides, and nearby pipes. Don't rely on the appliance's exterior dimensions alone; the cabinet opening may need to be larger.
What should you measure before choosing equipment?
Measure width, height, depth, and the path into the cabinet. Include the outlet, plumbing fittings, and any space needed to pull the appliance forward for service.
Check the finished counter height and the location of the cabinet's toe kick. Make sure the door can open fully and that a filter, drain tray, or removable panel can come out without taking apart the cabinetry.
The Avalon A4BLWTRCLR is a freestanding bottom-loading cooler measuring 12 in deep, 13 in wide, and 41 in high. Those dimensions describe the cooler itself, not the extra clearance its installation may require.
Don't plan to hide it beneath a low counter just because the cabinet seems deep enough. Its height and bottle-changing access need to suit the actual location.
What plumbing and drainage should you plan?
Confirm the water supply and drain requirements for both machines before installation. Ice makers commonly need a water connection, while their drainage setup varies by model.
Read the manuals for inlet pressure, tubing size, shutoff valve placement, and filter requirements. If you want one supply line to serve two appliances, ask a plumber whether a branch connection will meet both units' needs and local rules.
Drainage can be a deciding factor. A gravity-drain model needs a suitable route and slope, while a pump-based design has different requirements; don't assume one drain arrangement will work for every machine.
Keep shutoff valves reachable without moving heavy appliances. A small leak is easier to manage when you can stop the supply quickly and inspect the connections.
Where should power outlets and controls go?
Use the electrical setup specified for each appliance, with outlets and controls you can reach. Check the manuals for voltage, circuit, grounding, and outlet placement before work begins.
Keep cords away from water lines, drains, and places where they can be pinched. Don't hide a plug behind a fixed panel if you must pull out the appliance to disconnect it.
Avoid extension cords unless the manufacturer's instructions explicitly allow them. Ask a qualified electrician about outlet placement or circuit needs when the cabinet plan doesn't give you a safe, accessible connection.
Which water dispenser styles suit an under-counter plan?
A built-in dispenser or under-sink system is usually easier to fit inside cabinetry than a freestanding bottle cooler. The right choice depends on whether you want plumbed water, bottled water, or a separate drinking-water tap.
An under-sink dispenser uses a faucet or tap above the counter while its equipment sits in the cabinet. A freestanding cooler needs floor space and room for its bottle, vents, and dispensing area.
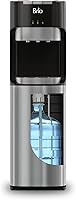
The Brio 520 Series is a freestanding, bottom-loading water cooler with a 5-gallon bottle and hot, cold, and room-temperature settings. Its stated dimensions are 15.6 in deep, 12.2 in wide, and 41.4 in high.
Its cabinet height makes it a poor match for a typical low cabinet opening. Compare Brio water cooler options if you have a separate floor location.
The Frigidaire EFWC498 is also freestanding and top-loading, with a slim 36 in height and dimensions of 11 in deep by 11.5 in wide. It accepts 3- or 5-gallon bottles, which still need open space above the unit for replacement.
Consider it only where the full bottle can be lifted into place and the vents stay clear. A compact footprint doesn't make a freestanding cooler a built-in appliance.
How can you keep service access clear?
Leave a way to reach the shutoff, filter, plug, drain, and service panels. An appliance that fits the cabinet but cannot be pulled out or opened can turn routine care into cabinet work.
Plan for the direction each unit slides out. Avoid placing a water line or outlet where the appliance will crush it when pushed back.
Think about filter replacement and cleaning before fixing panels in place. If a filter sits behind a removable grille, confirm that you can remove the grille without tools or without disturbing the countertop.
How do you choose equipment for the space?
Choose equipment by installation type first, then compare its features. A freestanding cooler's temperature settings or bottle capacity won't solve a blocked-vent or low-clearance problem.
Use the manuals to rule out models that don't fit the available opening, utilities, and access plan. Then compare the dispenser features that matter for the separate location, such as bottle loading style or hot-water controls.
For a household with children, compare water dispensers for kids and check the hot-water safety details for each model. If the cooler will sit outside the cabinet, our guide to water coolers for home can help you compare freestanding options.
What should you check before installation?
Verify the measurements, airflow, connections, and service path against both manuals before cutting or closing cabinetry. If any requirement is unclear, contact the appliance maker or ask a qualified installer to review the plan.
Use this checklist:
- Confirm that each model permits under-counter or built-in installation.
- Measure the opening and required clearances, including room for trim and fittings.
- Keep vents open and allow the specified airflow.
- Confirm the water supply, shutoff, drain type, and electrical setup.
- Make sure filters, plugs, and service panels remain accessible.
- Test access to doors, controls, bottle changes, and appliance removal.
A water dispenser's materials and construction can also matter when you compare models; see what a water dispenser is made of for a plain-language overview.
Can an ice maker and water dispenser fit under a counter?
Choose an under-counter ice maker and a dispenser that both allow the planned installation, then verify their clearances and utility requirements. If a water cooler is freestanding, place it in an open spot with room for ventilation and routine access.
Pick a built-in dispenser if the water unit must sit inside the cabinet. Pick a freestanding cooler if you have a separate floor location, and keep the ice maker's drain, water line, and vents clear in either plan.
Frequently asked questions
Can I put a water dispenser under a counter?
Only if the dispenser is designed for built-in or under-counter installation and its manual allows it. Many bottle coolers are freestanding and need open space around their vents, room for bottle changes, and access to the controls.
Check the exact model's installation instructions before cutting cabinetry.
Does an under-counter ice maker need ventilation?
Most under-counter ice makers need ventilation, but the required location and clearances vary by model. Some vent at the front and fit beneath a counter, while others need space at the sides or rear.
Follow the manual and don't block a grille with trim or stored items.
Does an under-counter ice maker need a drain?
Some under-counter ice makers need a gravity drain, while others use a pump or a different drainage setup. Check the unit's manual for drain type, outlet position, slope, and any pump requirements.
Confirm that your home can meet those conditions before you buy.
Can one water line supply an ice maker and a dispenser?
It may be possible to branch a suitable water line, but the connection depends on each appliance's requirements and local plumbing rules. Check water pressure, tubing size, shutoff access, and any filtration needs in both manuals.
Have a qualified plumber assess the setup if you're unsure.